Showing posts with label Crafty Bits. Show all posts

Wednesday, February 10, 2010

Crochet ville!

I know! I know! I can hear everyone saying, "Where have you been? You are unemployed and have nothing better to do than post a million blog posts!"

True! But I've been busy! Busy with nothing. It really adds up. You know coffee, napping, Taebo, episode upon episode of The Wire.... Speaking of which, if you haven't watched that show - I highly recommend it.

Anyway, I leave in a week so I've been trying to wrap up a few craft projects. I've finally put my quilt together, but I don't want to talk about the borders yet so I'll leave you guys waiting.

Its valentines day this weekend and while I don't condone the purely commercial value of this holiday, I do enjoy gifts from the heart. So I made my love this little valentine:


Its my internet debut of water colour! I had a slight accident and had to redo it about halfway through, so please forgive how George Costanza isn't quite up to par. The original was a better likeness.

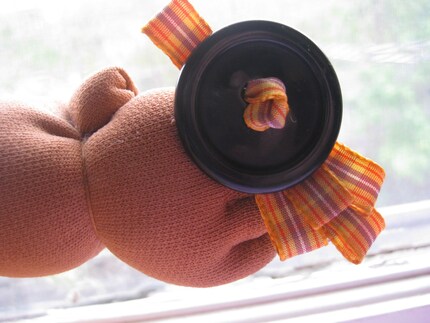
Also on my list, my friend is having a baby. I made her these little abominable slippers:


And finally, because I cannot get away from doilies, I have found an incredible japanese yarn. Its hand spun and hand painted and glory of glory comes in Thread crochet weight! Well actually its technically called 'cobweb' weight, but that just makes me love it more. They wrap it up so that you can see all the colours. It really updates this entire doily thing. Imagine the possibilities!


After seeing this picture I'm even shocked. It really is beautiful.

Sunday, January 31, 2010

Cold Weather and Doilies for Friends

The weather has been pretty good these past few weeks, I've got to go out and test my new snow shoes a few times. I highly recommend any kind of snow shoe that has a metal pivot for your foot, and a huge claw attached to the bottom. Climbing any sort of incline in traditional snowshoes is pretty much impossible, but these claws sort of make me realize that humans are really missing out. The things I could do if I had bear claws!

Here are some pictures from one of our days out.


Also, doilies! I tend to really get into doilies, but upon their completion hold them up and think,"Huh.... Now what." Because really, what do you do with them? I have recently discovered though, that through Google Picasa you can browse public albums which just happen to be entire crochet books scanned helpfully by someone across the world. If you know the name of a specific book, I'm nearly positive that it will be there. Professional patterns have never been so awesome, or so free.


Thursday, January 7, 2010

Snake Scarf Revealed!

I finally tried to take some pictures of myself in this snake scarf. But its sadly dark when I get up for work in the morning, and nearly so by the time I get home. Pretty depressing if you ask me.

So here are some pretty lame pictures of myself, taken by myself - please excuse the rather... vacant look on my face. I don't quite have the camera skills (and camera!), nor the poise of one of my favorite self-portrait artists over at the clothes horse. She always looks so beautiful.

I digress.


Look at this mug!


I'm killing myself here.

If you want to make yourself one after looking at these appealing pictures, its quite simple - if not painstakingly repeatative. Get yourself one ball of yarn and one Knitting Spool. Etsy has some good ones available here and here. I might use a thicker yarn in my next attempts - it would make my neck a little warmer rather then simply just pretty.

Step one: start yarn on knitting spool.
Step two: continue to knit on spool until entire ball of yarn is used up.
Step three: wrap around your neck multiple times in a pleasing manner, until you've achieved the 'look', saving enough knitted snake to tie it together in a bow or something more simple.

Ta-da!

Anyway, here are some rather belated pictures of my Christmas presents.


Looking back on these snowflakes, I've decided two things. One, compared to my most recent doily, my thread crochet skills have improved dramatically. Two, I really need to invest in quality patterns, rather then internet patterns which have multiple errors.

Thursday, November 19, 2009

Things I did, at some points in time....

So I really have been crafting.
I swear.


I made this hat. It was supposed to be slouchy, but I never really listen to yarn size and thus, it turned into a beanie. In the end I re-did it, trying to alter the pattern in an attempt to make it more slouchy - but it was even uglier.
So I gave it away.


I also found a bunch of really old dried up red peppers in the back of my fridge. I decided I'd try to plant them and see what happened. This is what happened! Now mind you we haven't gotten any peppers yet, but nearly all the seeds sprouted into nice, spicy, little plants.


Also, Jean Poutine, my kitty, is going to be little forever! Thank you crack house upstairs! The vet told me that because he had what you might call a deprived childhood he is stunted!


A dream come true - really. Although the vet did give me a funny look when I said that.

Monday, October 19, 2009

T-Shirt Quilt Step One, two, and three

I have been a bit crafty lately. I decided to take all of my old t-shirts that I'm really attached to and make them into a t-shirt quilt. You really only need so many t-shirts in your life anyway, but they always have such strange memories attached to them... so I almost always find it really difficult to throw them out or give them away.

A quilt means I can save them forever! And my kids (or probably my nieces and nephews) will see how awesome I was when I was a teenager!

Materials:
T-shirts! - I have 12 in mine: 3 by 4 makes a double I think
Batting!- You can get really cheap bags that come in a pre-set size (twin, double, queen etc)
Backing! - Enough to cover the back of your quilt. The sales lady helped me find something that was triple wide so I wouldn't have to have seams down my back
Piecing material - I am using the same material as my backing, because I am lazy about trying to match something to 12 different t-shirts and also because my budget wouldn't let me go crazy. This is going to be used to fill in the actual blocks cut from the t-shirts so they are all the same size - good luck figuring out how much you'll need. I just bought a shit-ton.
Fusible/non-woven/medium weight interfacing! - to make the t-shirts usable.

You'll also need:
A sewing machine!
A rotary cutter!
An iron! (I just bought my first one ever!)
A cutting mat!
Clear block ruler.
and thread!


Step one:

I sat down and actually figured out which t-shirts I was going to use. I ended up needing three, so I stole a few from our most recent clothing swap and also one from my mom.

(Some of my treasured old rags)

Step two:

Maybe a professional would tell you to do this in a different order but this is what worked for me. I cut out the print from each t-shirt, and tried to do it in a way that I got the largest sized block I could. I didn't try to make them all the same size at this point - I just wanted to see what I would/could be working with. You can always regulate their sizing later.

Knits (t-shirt material) is literally horrible to make a quilt out of. It stretches like no ones business, and is pretty heavy. So even if you did some how succeed in cutting a perfect square or rectangle block out of it, your quilt would eventually turn into a pulled-out, ugly old rag if you used it more than once.

The solution is to buy fusible, non woven, medium weight interfacing. You get to iron it on the back of each shirt (glue side down!) and then suddenly the fabric makes a lot more sense.

(A shirt with interfacing on it)

Step three:

(my non measured pieces)

Spread your pieces out on a floor or huge table. Move them around and put them into the order you want for the finished product.

I measured each block and figured out what size I wanted the finished block to be. I usually tried to do it so I had roughly an inch on all sides of the image. Write down the measurements for each block or else you will cry later!

(I drew it out a poorly to scale version showing which shirt was where, and how large the finished piece would be because I am a visual person)

So from here you can figure out the widest and tallest pieces (one was 12" wide and another one was 11" tall). I want a border all around each shirt for consistency's sake so I figured out that a completely finished block would be 14" x 14". This means I'll have to cut borders for each shirt and all the border pieces will have to be customized for all my different sized shirts. Annoying, but at least my finished blocks will all be the same size in the end.

So before you cut: WAIT!
Make sure you add 1/4" to all sides of every piece you cut for sewing allowance. This will mean that a shirt piece that is 10" x 10" finished will actually be cut 10.5" x 10.5"

Man this probably makes no sense what so ever.
I'll post more steps later, but I'm tired already.

In any case here is my first 14"x14" block... just so you can see a finished one.


Tuesday, October 13, 2009

Swapin'

I joined swap-bot awhile ago, because I am pretty cheesy and really like to get snail mail. If you haven't heard about it, its a place for people to join/create swaps which can be either electronic (and boring!) or postal. Its got a strange rating system to make sure all packages are sent and on time - but I guess thats a good thing even if its way more nerdy.

So far I've joined two swaps and gotten 2 awesome packages in the mail. I was supposed to get three - but I'll cross my fingers and hope my partner isn't being a lame dropout.
I think I'm going to find another one, because I got some really awesome stuff. And I also understand what other people will expect from me and what equals an awesome package.

Anyway - one of the swaps was based around colours: ie - send your partners something yellow, something black, something green, something red etc.

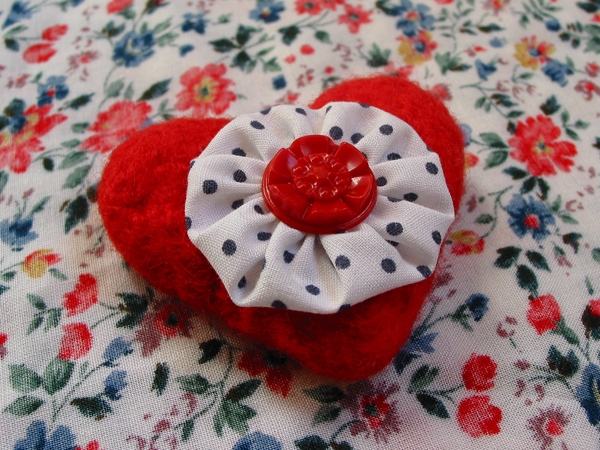
I sent a tiny heart I had hand felted to a lady in Lithuania and she jazzed it up a little bit. I thought I'd share our handiwork - although the creative bits are definitely hers <3


I wonder what she will use it for...

Monday, July 20, 2009

Okay Mom

Its pretty bad when your own mother lets you know that you are behind on your blog. I've been busy mom! But she is right - I have neglected it.


I still don't have pictures of my headdress on me - I have pictures of it complete though....


Basically I added those nice sequin medallions on the side, on top of a tiny tea stained doily. I also added a bunch of dangly side bits. Most of the bits are collected from family and friends. A lady that visits the coffee shop a lot gave me some eagle feathers she has been collecting from the base of a tree with an eagle nest at the top.

I had some left over feathers so I sewed them to some strips of fabric, added some trim and finished it up with some ribbon ties. Now I have two shin-lets and either a really revealing feather skirt or a huge feather belt.


I am off to the Eclipse Music Festival this weekend - so hopefully there will be lots of pictures surfacing with me all done up. Other wise no one will ever see me as I'm afraid most of the feathers will not survive me raving for 4 days straight.

Speaking of which here are some really really awesome videos from last year....
Eclipse during the day
Eclipse during the night (I can already tell me and the cat lady will get along)

Tuesday, July 7, 2009

Project War Bonnet - (nearly) done.

Its Done! It's Done! It's Nearly Done!

I can't even believe it - how long did I bead that god forsaken headband? At least 8 or probably 16. I did it at work though (sneaky!) so technically I did get paid to do it :) I didn't even think I could bead like this - and I'll be the first to admit I impressed myself with my beading skill. Check out this sucker:


I used a ragged old piece of leather for the headband base (thanks Nan!), and also a piece of upholstery sample for the bead work because I quickly realized there was no way in hell I was going to try and bead on leather. I used some old quilting fabric for the ties too (Thanks Aunt Debbie!). Most of the materials were scavenged or given too me, even the center piece of the beadwork was an old/broken broach I got from a relative. I'm even going to use some pottery beads I scavenged from my other grandmothers house (she said she had made them a very long time ago) for the dangly bits I plan to staple to the side of my head.
I didn't think I would be so attached to it, but now that I see how proud I am of it and how much of my family went into it.... I might hold on to this more dearly then I thought.

(love)


So I will post a picture of me wearing the finished product soon.... Also.... does anyone think its a good idea to post this as a kind of available custom piece on Etsy? It would more then likely be about 120$ if I did.. maybe more.

Monday, July 6, 2009

War Bonnet of love

Well my war bonnet is coming along very very nicely. I've just figured out how to attach my feather trim and my 14 inch pheasant feathers. I still have some tweaking but it should be almost done soon.

Bad news is that I lost my camera so I can't document it very well. WHERE DID THAT THING GO?!

Here is what I did manage to take a picture of though, its the beginning of the bead work I did on the headband:

Tuesday, June 2, 2009

Mustard Hoola Hoops

Okay I did it! I went on a crafting supplies shopping spree and spent far to much money but really... I don't need food that much. I've always thought food was silly when I could be crafting.


I bought a mini jewelry plier set with a selection fo wire and beads. I fully plan on using it to work on my feathered warbonnet. It was inspired by Nobody from the movie Dead Man

Here is what I already have done (which is basically nothing):


I ordered pheasant feathers in green and natural, and using coloured hemp I created a wrapped bottom with a little loop at the end. I first glued it with a glue gun to the base of the feather and then wound it around and finally tied a knot over a dot of glue - making sure to work in a little loop at the bottom so I can easily add it to my headdress. I adapted instructions found in The Readers Digest, Young Peoples Annual, 1963

I also got a very very nice hula hoop (sans decoration) from Katyhead and her friend Emily.

Although its got an industrial appeal right now I'm sure these ribbons will spice it up a bit. My friends and I have a saying for this colour/style scheme: mustard.

Thursday, May 28, 2009

Etsy Shop

I did it! And it only took me 4.5 hours! I have an Etsy.com shop now. Its called Fiesta Saurus and currently I've only got one tiny little item in there as a tester.

But its pretty cute isn't it?


A little bitsy hair clip made with love.

It only took enough time to waste the few hours I had between jobs.
:)